Panorama configuration
This article explains how to set up your yellow panorama camera in the yellow portal once you assembled it.
Activate the panorama peripheral
The first thing you need to do is activate the panorama peripheral in the camera information tab:
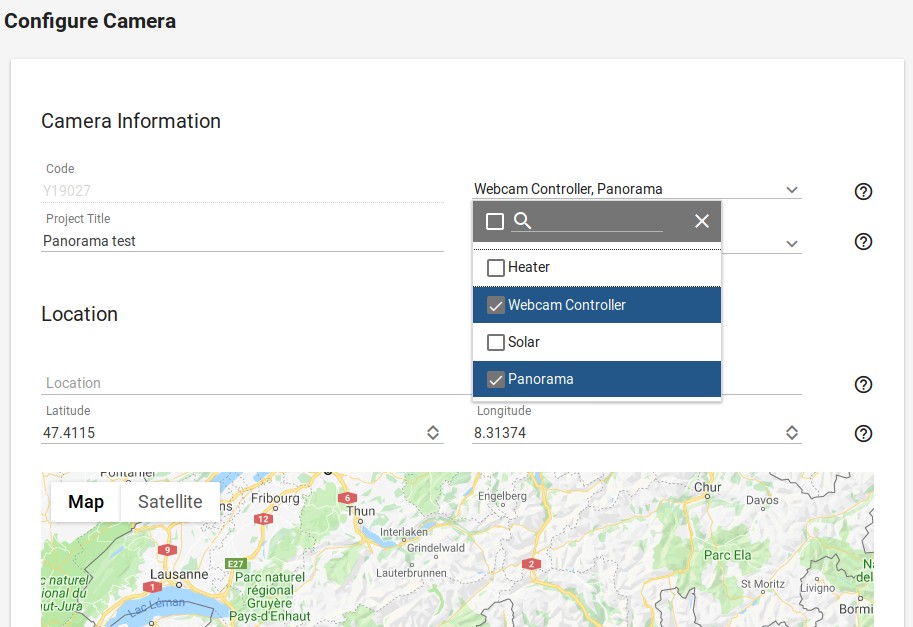
Note that you have to use it in conjunction with the Webcam Controller, like all other peripherals.
The panorama camera can be used together with a heater, but support for solar mode isn't quite there yet at the time of this writing.
Once you save these settings, new configuration options will become available in the bottom right of the page (you probably have to scroll down a bit).
Choose a suitable camera
Technically, nothing is preventing you from using any of our supported cameras in a panorama camera. However, we strongly recommend a Nikon Z6 or Z7. Not just for the higher resolution they support, but also because they are currently the only fully supported cameras with fully electronic shutter. This can be rather important for a panorama camera. A cameras shutter and mirror can only do so many movements before they wear out. With a panorama camera, you are likely to release the camera at least 6 times to compose a single image, probably more. In other words, a panorama camera with moving parts is liable to live at least 6 times less long than its non-panorama counterpart.
The electronic shutter also enables you to use our new iterative exposure algorithm, which is a lot more precise and adaptive than the old one. Learn more about that here.
Configure the panorama peripheral
Upon activating the panorama peripheral, A new configuration section becomes available all to the bottom right of the page:
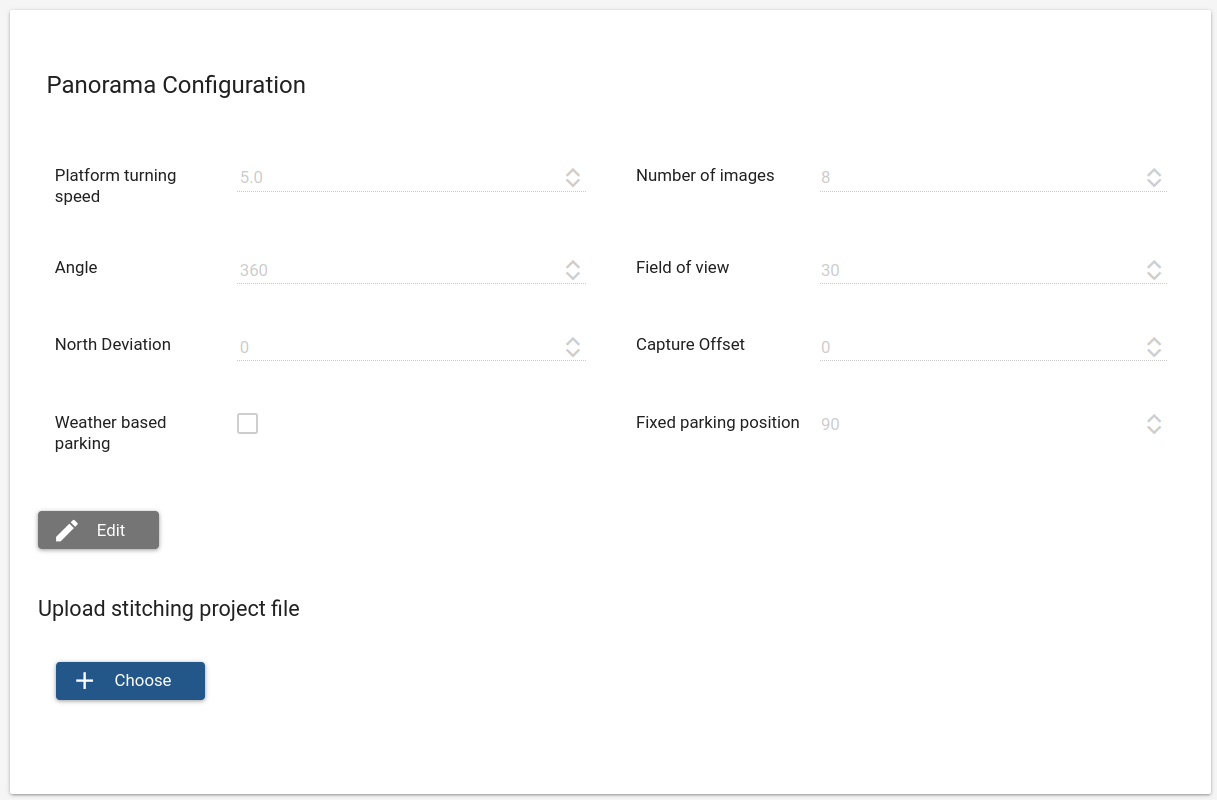
This lets you configure everything you need to capture the panorama that you want in the way you want it. The available configuration properties are as follows:
Platform turning speed
The speed at which the camera will turn from one capture position to the next, in revolutions per minute. High values will lead to diminishing precision in repositioning, as well as increased noise level, but the panorama capture will be faster. Adjust this according to your needs.
Number of images
The number of images your panorama should consist of. An optimal number depends on various factors, such as the overall angle of your panorama, the field of view of your camera, the desired target resolution and your tolerance for latency. More images per panorama will lead to a higher overall resolution, but this will lead to rapidly diminishing returns when you start having more than 20% to 30% overlap between the images. More images also means more work to stitch them all together, which means that this setting might drastically increase the time it takes not just to capture all the images, but also process them into a single panorama image. On the other hand, each panorama will require a minimum number of images with at least some overlap, otherwise it simply cannot be stitched together.
Angle
Panoramas that go all the way around are certainly impressive, but not the best choice for every situation. So if you need a panorama with a horizontal field of view of less than 360 degrees, you can adjust that here.
Field of view
This is a special parameter that only applies if your panorama is not a full 360 degree panorama. In this case, the panorama motor has to guess the center of the first and the last image so the final result will have the desired angle. To do so, it needs to know the horizontal angle of the field of view the camera is set to.
North deviation


If this value is set to 0 (zero), the natural home position of the camera will be treated as facing north when calculating the parking position. In case the camera is not mounted facing north, this value must be set to the angle relative to north in degrees.
The two images above show some examples. The left one shows a camera that was mounted facing north east and the second camera was mounted looking west.
Capture offset
This defines the starting point of your panorama relative to the cameras natural home position, in degrees. We recommend to mount the camera in a way that its natural home points to the beginning of your panorama, but if for some reason this is not possible or you need some fine adjustment at the end, this parameter has you covered.
Weather based parking
If you enable weather based parking then the camera will calculate its next parking position based on the current weather around it. For example, it will attempt to park facing away from the wind to protect its front glass from rain or snow. In order for this to work as intended it is crucial that the location and the north deviation are properly configured in the settings.
Fixed parking position
Depending on where the camera is mounted it can be beneficial to define a fixed parking position instead of parking based on the weather. Rule of thumb: Set a fixed parking position if the camera is mounted on or close to a wall and let it face the wall when inactive. For freestanding cameras weather based parking will normally be the better choice.
Color temperature bias
Unified color temperature throughout a panorama can be tricky if there are multiple light sources around, since the camera might apply different color corrections for different images that then get stitched together into a single one. The panocam therefore calculates its own color temperature correction based on the first image in the panorama, and then applies these settings consistently to each individual image. The color temperature bias settings give you an opportunity to influence the result of that correction. You can adjust different biases for day and night, and the panocam will attempt to smoothly interpolate from one into the other at dawn or dusk.
Panorama stitching instruction
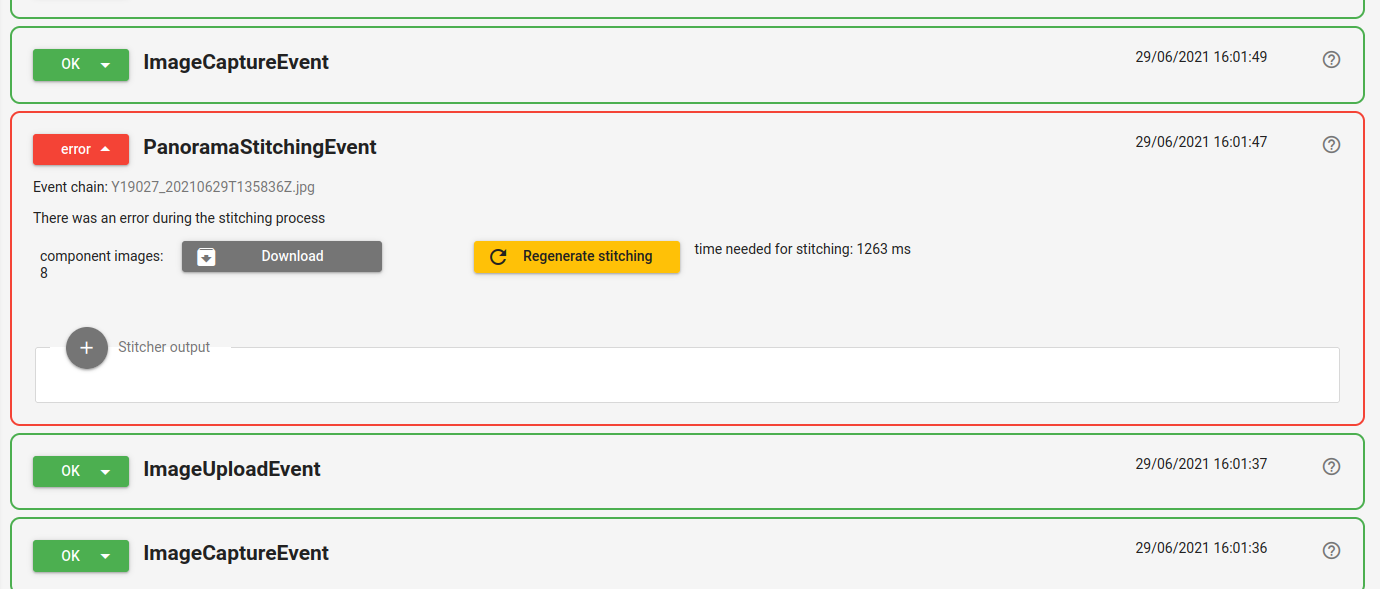
The required instruction file for the panorama stitching is generated automatically. This is done with the first batch of images captured by the camera.
Whenever there is a change of the image ( e.g. change of image size) or the camera position it is required to re-generate the stitching instructions. This can be done in the event log, by expanding the latest PanoramaStitchingEvent (which is marked as an error because of a image size configuration change) and clicking on the yellow Regenerate stitching button.
Create a customized panorama stitching instruction (optional)
Besides the automatic panorama project generation, there is an option to upload a customized instruction file.
PanoCam uses the Hugin toolchain to stitch individual images together into one final panorama. To do so properly, it needs a project file that defines the properties and operations to be applied, so you'll have to create one and then upload it. However, there's a bit of a catch here: To create a Hugin project, you need to have the individual images the panorama consists of. Thankfully, the yellow portal provides you with an easy access to those images.
When the camera has taken its first panorama, an error will show up in your event log that the stitching failed:
This is perfectly normal, since the stitching cannot succeed without a stitching project. You can click on the error to expand the event to see more data, and it will present you with the option to download the component images of the panorama:
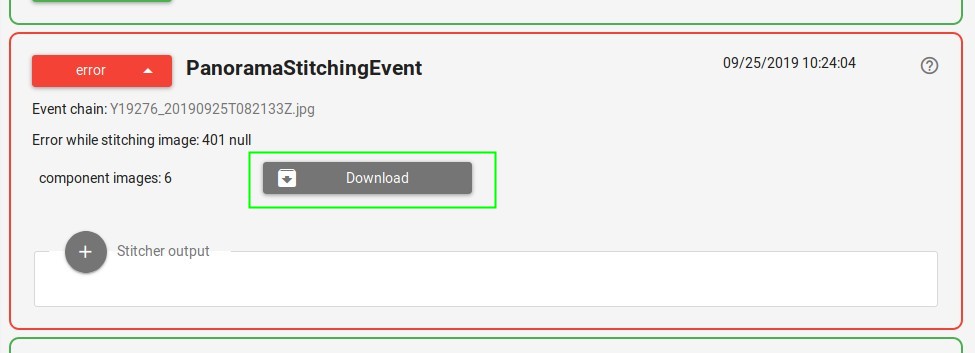
When you click the button you will see a loading icon while our service is digging up and packaging the relevant images, and once that's done the button will be replaced by a link you can click to download the zip file. It will contain the individual images you'll need to create your project.
How to actually create a Hugin project is not within the scope of this manual, but there are a lot of great resources around. You may start with this good introduction into the basics, and if that is not sufficient for your purposes, you will find a wealth of more advanced resources on the official tutorials page.
When doing that process, the product you're really interested in is not the stitched image, but the .pto file that hugin will ask you to save before creating it. Once you have that, you can use the file upload dialog in the panorama configuration on the yellow portal to upload it, and it will be applied to future panoramas taken by this camera. You may replace this project at any time you like if you come up with a configuration you like better.