Die Inbetriebnahme der Foto-Webcam ist einfach. Mit Hilfe des Displays kann die Kamera gerichtet und eingestellt werdenThe setup of the Photo Webcam is easy. The camera can be set up and installed with the display’s help.
| Info | ||
|---|---|---|
| ||
Öffnen Sie das Kameragehäuse nur bei trockenem Wetter. Es darf keine Feuchtigkeit ins Gehäuse eindringen. Diese würde sich an kalten Tagen am Frontglas niederschlagen. Bei Bedarf können Silicagel Trockenbeutel eingelegt werden. |
Foto-Webcam ausrichten
- Kamera montieren, grob richten und am Mobilfunk-Router oder Internet anschliessen
- Stecken Sie das USB-Kabel (schwarz), welches von der Kamera zum Raspberry Pi führt, am Raspberry Pi aus.
- Kameradisplay ausklappen.
- Kamera mit mechanischem Schalter in Live View Mode stellen.
- Foto-Webcam ausrichten, Objektiv zoomen und fokussieren.
Wenn Kamera ausgerichtet - USB-Kabel (schwarz) wieder am Kamera-Kontroller einstecken.
- Display schliessen.
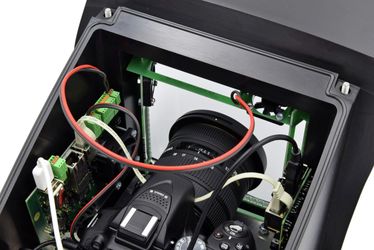
Bild: Kameragehäuse mit Kamera offen
Foto-Webcam Kontrolle der Fernsteuerung
- Mit "Capture Image" ein Bild fernauslösen.
- Mit "Refresh" die Seite neu laden.
Je nach Übertragungsgeschwindigkeit erscheint das Bild nach einigen Sekunden im Portal. - Kamera durch Klick auf "Focus" fokussieren.
- Bildbereich mit linker Maustaste zum Fokussieren anwählen und "Set Focus" drücken.

Bild: yellow-Portal, Actions Menu

...
| |
Open the camera housing only if there’s dry weather. Prevent any humidity entering the housing. Water vapor could condense on the front glass on cold days. If required you can put in silica gel dry sacs. |
Photo Webcam Aiming
- Align camera mounting approximately and connect with mobile router or Internet.
- Unplug the USB cable (black) at the Raspberry Pi.
- Open camera display
- Set the camera with the mechanical switch to Live View Mode.
- Aim Photo Webcam, zoom and focus objectives.
- When the camera is aimed, plug USB-cable (black) back in the camera controller.
- Close camera display.
Picture: open camera housing with camera
Photo Webcam Check Remote Control
- Take a picture by portal remote control with “Capture Image”.
- Reload the page with “Refresh".
Depending on the transfer speed, the image appears in the portal after a few seconds. - Focus camera by clicking “Focus”.
- Chose an image area to focus on by clicking on it with the left mouse button and pressing “Set Focus”.
Picture: yellow-portal, Actions Menu
Picture: Focus camera by remote control